16 June 2007

Progress or lack of!!!

Well I decided that last night it was time to tackle the problem of the gecko's head/nose!!!
I tried an idea out which you might not be able to follow by looking at the picture below. I'm pretty sure though that it's going to work out just fine. I think another couple of ds on the nose ring should be the answer.


Then I wanted to start a 'final' gecko with the 'new and improved' head. Hmmmmm, remind me NOT to drink red wine after a very busy day!!! I actually - now wait for this - I actually - hold tight - I really, honestly did some housework in the morning. There, I've said the dreaded word!!! Below is where I got to before I fell asleep in the chair!!!! You can see that I'm trying it out with two colours (one is a variegated rust to red/brown) and lots and lots of SLT's thrown in. I think this is going to be a really cool gecko!!!

12 June 2007

Yesterday's Gecko

Yesterday's gecko now has eyes!! Not quite the right shape for the nose according to my 'gecko guru' - Pamela so I'll get back to working on that another day!!! I agree with her too the face and nose isn't quite right. Why is it always such 'silly' little details that are the making or breaking of the final piece? I struggled and struggled with the Palmetto frog as I just couldn't get the face right on that too. Other patterns just 'fall' into place.
I'm working on a 'top secret' project at the moment and can't allow myself to share it yet. One day I will but it's really, really top secret! It's going to be SO hard not to share.

11 June 2007

Another gecko

I had a visit from another tatter on Saturday who happened to be staying in our town. She gave me this little gecko or alligator made of beads. Isn't he cute? Measures just under 3 1/2" from the tip of his nose to the end of his tail.
She also showed me the tatting she was working on and amongst her pieces were several seahorses. She told me that she knew the pattern by heart as she'd got it from My Weekly a few years ago. I said I knew it too - it was my design!! She was very surprised!!!!

10 June 2007

What is the difference - later in the day!

I thought it was worth copying and pasting Pamela's comments onto the main part of the blog as she's solved a few mysteries for me!! Comments are easily forgotten so I didn't want this one to get lost.
Thanks, Pamela - much appreciated.
Jane

First things first.......Does the difference between a salamander, a lizard and a gecko matter. I guess it matters a heck of a lot to another one!!
So what is the difference, well a gecko IS a lizard. Just a kind of lizard with those extra special sticky pad toes that enable it to climb up a sheet of glass.
But it wont come across a sheet of glass in the wild you may well ask!! Maybe not but I guess it's a pretty useful bit of gear that lets you escape along a shiny banana leaf or up a smooth barked tree when being pursued by a predator.
House geckos that many of you will be familiar with are well adapted for running up walls.

So what's the diff between a lizard and a salamander. Simply put it just that one is higher up the evolutionary scale than the other. When the fishes crawled out of the sea on their adapted fins they evolved into Amphibians (frogs, toads, salamanders) and developed lungs to breathe and legs to walk on. BUT they still need to live near water as they have a moist skin that would dry out and they lay their eggs in or near water and have aquatic young that use gills to breathe.

Reptiles (lizards, crocodiles, snakes, turtles, tortoises) followed them and are truly terrestrial with a dry scaly skin, are fully air breathing and do not need to rely on water although many have secondarily returned to live in it.

So on to Jane's gecko
I LOVE IT, I LOVE IT, I LOVE IT!!!

This is my dream tat gecko, I have been trying to get Jane to design this for me since the first day I was aware of her wonderful talents. I have poked and prodded and tempted her with photos and drawings of geckos until I finally pressed the right button. Have to keep her challenged and on her toes for the sake of the tat world!!

The first thing that comes to mind when I see this gecko in it's present stage (and you will think this strange) is that the design must have been easy because that is exactly what it should look like!!
Maybe this is the highest compliment I can pay her because I know very well that it wasn't easy at all, especially when she challenges me to design one and I don't know where to start!! somehow or other my brain is missing a bit! how I wish I had it!!

Down to the nitty gritty then, the legs are fab, the body is fab, the split rings really give the impression of a back bone and ribcage. The tail is great, partic the fat bit at its base, tail can be modified in length and thickness according to species.
The head is probably the most difficult bit to get right, the drawing is perfect as you have captured the egg shape very well, but the tat head has got more round, lost its slim neck and its more pointy nose. Tho' there are some roundy nosed geckos. Why didn't that diagram work??
Maybe add another ring to lengthen the head.
Don't know how you are going to do the eyes, they are soosh important.
You are so nearly there and my shuttles are raring to go.
Thanks Jane for my gecko.

What is the difference?

Now it occurs to me that I don't know the difference between a salamander, a lizard and a gecko! Does it matter, I ask myself? Yes it does!
My friend sent me a link about six weeks ago to an Etsy shop where there was the mos
t adorable crocheted gecko for sale. I think it was a big hint as her husband acquires real geckos from time to time. Anyway, Pamela (the friend and designer of the alternative meercat head and bent flamingo leg) is the one I really need to ask as she and her hubby are the experts.
I thought ab
out this as a project for a while (well, about ten minutes) and decided to make a start a few days later.
Life has been rough, very rough lately so it's taken me time to star
t blogging it. This will be a looooong post so get yourself a cup of tea or coffee and sit tight. OR just close this page down!!!
Where to start? Well I decided to start with the tail so this was my first attempt.
First of all the whole thing bends the wrong way - well, not the way I planned!! I'd found a 'model' to follow through Google images and his whole body bent the other way - downwards!! I continued with this sample to try and get a front and back leg done.

Not too bad but at this stage it appeared to me as if it would have to be done in several 'parts'. Meantime I also used my drawing software to 'play' with the whole concept. Here's one of the drawings which you can see has an 'alternative' tail. The head looks good in this drawing but that doesn't mean to say it'll work in 'real tat'!!
I now had to start again as I'd decided that this could be worked in two parts. Same start place but ........
This time, and in order to make the tail and body more stable and 'encourage' it to bend in the way that I wanted, I used the same formula
of split rings but added very small picots on the lower sides to join them to each other. This appears to have worked as you can see below. BUT where to go next? Obviously the head and then back down the top side of the body as before.

The head. Hmmm, it needs to be simple. The drawing looked good (above) but when I worked it and re-tatted it several times I didn't like it one bit!! I decided to leave it as it was and continue down the top side of the animal just to see if it would 'improve with keeping'!!! It was also an opportunity to test the written text for the legs. I was still intending to go to the base of the tail and stop.
At this point the plan was to then start again from the nose and make the other side. Then, whilst thinking about this I suddenly realised that by doing it
that way it would mean that the tatter would have to do frontside/backside tatting for the block tatted legs to look good!!! I'm not a fan of this type of tatting (needs too much concentration for me) so decided I'd have another think!
Oh, I might add here that I do use frontside/backside if I'm sure the item's not going to be viewed from both sides. In other words if it's going to be sewn or stuck to a base.


A few days later and the 'penny dropped'!!!! Why not an alligator join instead of stopping at the base of the body? Then I could continue up the other side without having to do frontside/backside on the block tatting.
Ah, another problem here! On the first side I used the 'back' of the legs to bring the work from the claws back to the body. On this second side I'll have to use the 'fronts' of the legs. This needs some crafty design work to achieve!!! Can I do it? Am I capable? Hmmmmm. I also need to be sure that the legs are NOT the same as the first pair so that the gecko appears to be moving. Tat should be easy as they are constructed slightly differently!!
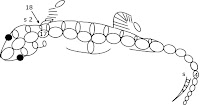
Well, here's the latest version. In the second picture I have added 'false' eyes. You will notice that the lower part of the face isn't the same as the upper part!! That's deliberate (cough, cough, splutter, splutter!) as I was trying out a second (and better) idea. I won't be doing any more to this design until Pamela comes back to me with suggestions! Over to you, Pamela!!!!!

Creative Commons Licence

Happy Beaks

Happy Beaks
I beg your pardon? I didn't quite catch what you said.