23 September 2008

Presents

Yesterday the postman came. IF he ever brings me anything it's usually a household bill!!!

There was a packet for me from the USA. I was SO excited as I wasn't expecting anything. When I opened it I found the shuttle below tucked inside a Palmetto tshirt. I was going to model the tshirt and then lie on the scanner to show you but for some weird reason I couldn't get myself to fit on the platten!!

Best of all was the letter inside which was from Barbara Hevener. She's the lady who won the competition for the tat days logo which you can see on their page. Apparently she thinks I did a lot to help her but I'm not sure I did!!! She has a copy of the drawing programme I use and all I did was nudge her along into using it - she's a VERY fast learner. I honestly don't think I did much but I'm SO pleased with my presents. Thank you, Barbara from a VERY happy bunny in the U.K.

22 September 2008

Good points and bad points

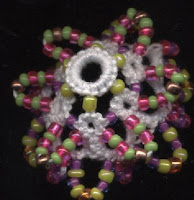
I've been working on the pendant and you can see progress below with at least two ideas trialed in the outer round. Looks good BUT it isn't really! The way I've added the central teardrop bead looks really good and is very easy but it's not in the right place. I need to get it dropped from the bottom of a ring and then re-joined later. I did this in this bracelet design so it's just a matter of changing things a little. Either that or I change the centre completely.

I'm reasonably happy with the outer round but it does need a lot of tweaking with the stitch count or a change to a number 40 thread. I'll decide later today!!!

I had fun yesterday adding all the blogs that I follow to my dashboard. Still not totally sure how this works but I'm gradually understanding it. I've now got 11 followers - yipppeeee.

I forgot to add that I've re-listed the remaining tatting leaflets in ebay.

20 September 2008

All sorts to tell today!

A boring, boring, megga boring evening on the telly and several false starts on the next earring which has now been upgraded to a pendant because I feel it's a tad toooo big as an earring - even for me!!! Also, of course, it gives me more scope to play. I've put two of my false starts down below with the third better one (with a hanging bead). I shall continue with this later. Also 'down below' are the finished medium earwigs which don't look half as good as they do in 'real life'. Nick says they look like expensive Victorian antique jewelery.

Goodness knows how but I was fiddling around with the blog and found a new gadget - followers!!! So I added it to the top left of the page. I was totally gobsmacked when I put it on to find that immediately I'd got five followers. Can't tell you how brilliant that feels. I use google alerts for blogs but I'm going to have a look at the gadgets again to see what others are being offered. I shall be looking to add myself to other people's blogs too!! BEWARE - daft old git at large!!!

Thanks to Sherry (celticdreamweaver) I have now added the Spanish couple to my site. I'd completely forgotten them. Sorry, Sherry but thanks for reminding me!!!

Earrings again!

This earring 'phase' is set to last a little longer, I think!! Doing these isn't as easy as it would at first appear. Adjusting stitch counts and making a very small (very beaded!) motif for the centres is also very hard.
Anyway, below is the progress on the medium sized hoop.
On the left is a central motif that just 'didn't work'. This attempt has now been 're-cycled'!!!! The middle one - this has a new inner but I wasn't happy with the outer part. I needed to adjust the stitch count and use better beads. The final attempt on the right is fine - for now!!! I love the hanging bead in the centre and hanging below the hoop. Looks 'classier' than the long beaded picot on the first trial.

18 September 2008

Fun with earrings

I finished the other earring of the pair I was making the day before yesterday (the brown ones) which means that I have yet another pair to choose from in the mornings!!! I really MUST clear out some of the darn earwigs - they're taking over my bedside table - in fact I'm sure they're breeding!!

Anyway yesterday morning I sat down and did the drawings for this pair. This is a fairly big task even though it's only a small piece as I want to be sure that people can follow my perverted way of working it easily.

In the evening I started working on the medium sized hoop. This one measures 1" in diameter so I don't want to make it any larger than that if I can help it. I've solved this problem by working beads into the covering over the ring.

The inner (as you can see below) is sort of OK. I shall work the central large bead into it in another way. I really fancy a 'dangly' something in the middle there. In fact I've been experimenting with ways to do that (the pink 'bits' at the bottom). All I've done is take ......... heck, I'll explain it on the pattern and do a drawing but it's really easy.

If you look really closely at the scan you'll see there are definite variations as I've worked round the ring. I was trying to work out how many ds's to do etc. I think I'll add another large 'dangly' bead at the bottom instead of the LBP. Anyway, that's this evening's task sorted!!!

17 September 2008

The new brain!

First reports on the new brain suggest it's a clumsy one!!! I hardly ever spill beads nowadays as I use those lockable bead containers. I managed to drop a small container that isn't lockable yesterday morning so had to get the small handheld hoovery thing out (with the piece of 'hosiery' that I keep for this purpose) and put this over the end to retrieve them. So, an hour or so later they were all back where they belonged.
Blow me down - I dropped more beads two hours later and they were some of my favourites - 3 blues all mixed up! So I reckon it's a clumsy brain that Martha sent me!!! I'm still sorting those!!
Still I managed to get started on my big project. Let me explain.
I've got two sorts of earring hoops and want to start using them. One sort is open (easily closed with a pair of pliers - on the left below) and the other is closed with a small ring at the top (easily removed with same pliers!!).
There are three sizes of one and two of the other so yesterday I scanned and measured them all. I've started on the smallest one first and this is what I've come up with (along with the pictures of the hoops I've been talking about). The blue and white is my first attempt, then there was another brown one which I wasn't happy with and haven't shown. The brown one below is fabulous and I'll make another to match.


16 September 2008

A NEW brain - at LASTl!

I think brain cell # 3 can go into retirement now because I have friends out in tat land who think of me and offer help in an entirely unexpected way.
Yesterday morning I received a letter from Martha Ess. Now this struck me as sort of odd as we usually email each other. So I opened the letter and there was a card. The note in the card read like this -
"Dear Jane. This all started when Beth Sims (of the Tennessee Southern Belle Tatters) made an off hand comment that she wished there was a tatted brain for her neuro-scientist boss. Well, I couldn't resist that ...... But everyone who saw it, including Beth, instantly said 'Jane needs more brain cells'. So here you are"
I read the card and wondered whether Martha had 'lost the plot' until I opened the folded sheet of paper inside the card. On this sheet was a pattern for a brain!!! Yes, honestly. That AND a brain included (see the picture below). Now I've NO excuse for not getting on and doing stuff. I'm now 'over brained'!!!! I don't think I'll ever become a genius but I'm certainly on the way now thanks to Beth and Martha. Thanks, Martha.
By the way - I nearly peed my pants when I saw my new brain.

15 September 2008

Christmas colours!

Yesterday I drew up the diagrams for this little earring/motif. I could do with a good name for it. I always struggle with naming my stuff. At the moment it's called a 'ring on ring in ring earring' but that's a bit of a mouthful and I don't think it should necessarily be 'marketed' as an earring either. All suggestions welcome. I am wondering if anybody would like to try this out to see if they can follow the instructions. I have them in a Word document so would happily take on a volunteer or two.

I also managed to do part 3 of the TIAS 4.This game is proving to be very good practice at doing block tatting!!!! I've sent Sherry my three stages this morning so she can blog them when she gets time. I've solved the mystery of what it's going to be but you'll have to wait until later when it's blogged here!!!

14 September 2008

I'm warming to this one!!!

I'm really beginning to love this earring. YES, I will wear them as earrings. Somebody mentioned making them in Christmas colours - that's this evening's 'task'!!! I'm currently drawing up the stages so it should be 'out soon' at a cinema somewhere near you. Sorry, I mean web site!!!!

Having made a few of these now I'm finding them fast to make.

I've been forgetting to mention my student at the antiques arcade in town. Remember that I was teaching her to tat? Well I pop in about three times a week for a fast lesson. She's managing rings now with picots and is ready to go onto the next stage. I think I'll have to stop calling her a student as she's become more of a friend!!!

13 September 2008

A girl has to do what a girl HAS to do!!!

Now most people know I'm not married but live happily in a muddle with my dear partner.  This means that the threat of divorce doesn't hang over me - once bitten twice shy in both our cases.  BUT this doesn't mean that a relationship doesn't have 'those moments'!!!  So in order to avoid one of 'those moments' arriving I felt obliged to tidy up my tatting stuff yesterday!!!  It does tend to migrate somewhat!  I decided to put the books (well over 100) tidily on the shelf as I tend to take them out, look at them and put them back on top of the others!!  I came across the leaflets (about 50) that I've collected too and then decided to dispose of the duplicates.  As the title says - a girl has to do what a girl has to do.  So I spent yesterday afternoon listing them in ebay.  The reason I've got so many duplicates is because people tend to list them in clusters and sometimes there are leaflets in a 'cluster' that I want so the others become duplicates.  

I also got part two of TIAS 4 done and I know what it's going to be.  It's a miniature Eiffel tower (or Blackpool tower!!!).

I got the earring finished too and a rough draft of the pattern.  I'm not sure if folks will want to wear this idea as earwigs as they are rather large!!  I know I will but if not they could make them as zipper pulls, decorations for handbags, brooches - almost anything.  

12 September 2008

Brain cell # 3

Well he (brain cell # 3) finally got a result late last night.  I don't totally like it yet so will take # 3 to one side and have a word with him later!!!!

It took all evening to achieve this one sample!!  The reason?  Brain cell # 3 kept wandering off into the other room so by the time I went to bed I'd decided that this was something that was going nowhere!!!  Looking at it again in the 'cold light of day' I can see that it has great potential.  Let me explain.

The centre motif is easy.  You do have to tie and cut but that should be the only one in the whole thing.  Actually covering the brass ring and including the central motif is easy but it took several attempts to get this right.  I've now got the 'recipe' for that sorted.  

What I should've done is put 1 bead onto the pink thread on the shuttle so that I could include a bead before the bottom pink split ring.  Then all you do is leave threads dangling.

The next round is just SO simple - rings and chains.  What I should've NOT done here is try to be so flipping clever.  I don't like that long beaded picot at the bottom.  It sucks big time.  I shall miss that one out on the next attempt.  I will have to add more doubles to the chains too.  Another mistake I made (and had to retro tat) is where I put the hanging LBP.  The first time I did it I put it on a chain instead of above a ring - dugh!!!  I think I'll probably use a second shuttle here and make a ring with the jump ring added.  

IF brain cell # 3 works properly this evening (and it is a wine drinking evening!!) then I should be able to get him to fathom a way of finishing the motif without sewing ends!!  That's the plan anyway.

11 September 2008

Arrival of brain cell # 3!!!

Well the pink dolphin and seahorse didn't stick around for long!!!  They were snapped up out of Etsy and are well on their way to the USA!!!

I started Sherry's TIAS 4 and have one thing to say.  Just one complaint/criticism. It's VERY dangerous to tell old gits like me to 'put aside for future use'. VERY dangerous!!!! I just know I'll lose it. Well done, Sherry - looks good but so far no guesses - unless it's a basket!!!  OR am I just a 'basket case'?  Answers on a pin head please to lovetotat at gmail.com!!!!

OK I started on another idea yesterday evening.  If you take a look at the brown earwig beneath you'll see that this was made on a brass curtain ring - one I made some years ago.  Not sure where the pattern is but I think it's on my site somewhere!!!  

Anyway, having learnt how to cover a ring with knots I decided to give it a whirl the 'modern' way - I don't like the ugly brass showing through.  First of all I made the centre purple part.  I then added the beads to each picot.  Next I took the tail end of the green thread through each picot to sort of 'lock' each bead onto the picots.  Next I used the shuttle end of this thread to cover the brass ring also working over the tail running through the picots.  This locks the purple centre to the inside edge of the ring - firmly and neatly.  

In the purple/green scan on the left you can see that I haven't put enough knots over the brass ring.  The next one shows an improvement but I think I still think I need more ds.  Using the tail end I've next worked a small SR to take me to the outer round - but knowing me this could and will change.  

Now why do I bother to cover a ring when this could be made by just tatting round the purple inner?  The reason is because I cannot stand 'bendy' earwigs.  Mine have to be very firm but pretty.  On other designs I've relied on beads to help keep the shape but sometimes there are 'other ways'.  I'll play with this again and although it might sound hard it's really VERY simple and I'll draw it out when I do the pattern.  

10 September 2008

Hmmmm

First of all I managed to get round to listing the pink dolphin and a few more roly poly bags yesterday in my Etsy shop.  The orange with purple flowers bags are really bright!!   I was tempted to keep a set but will part with both - I think!!!!  As it rained again most of yesterday I did quite a bit of computer stuff and also managed to make a banner for my shop!!  That was a big step for me!!!

Below are my tatting achievements for yesterday.  The orange and pink was going to be earrings but after you've looked and laughed it will be cut up and recycled.  Talk about major boo boo!!!  IF only I could read my own patterns!!!!  I didn't count how many beads to put in the centre of the first ring on the SCMR so that put the whole pattern out!!!  Actually it would've been too big for an earwig anyway!!!  I used a no. 80 with a sewing thread but next time (IF there is one!!!) I'll use just the no. 80 as I know that'll work!!!!  As a consolation to myself I made a sequin motif.  This one uses two sorts of chains.  First the lock stitch chain using 1st half flipped second half unflipped and then the other chains are 1 double flipped followed by 1 double unflipped.  I'm quite pleased with this so may add it to the sequin page as another alternative.


9 September 2008

Well, somebody had to do it!

Somebody really, really had to do it so I thought it might as well be me!!!  
I had this terrible and dreadful urge to make it so in the end I gave up trying to resist 'the call'.  I know that I'm classed as being 'slightly odd'.  Eccentric might be a better word (well, more 'upmarket') but I actually prefer the description of 'stark staring bonkers'!!!  So, I did it - a pink dolphin.  There, I said it - A PINK DOLPHIN. 
I got out the thread (well, actually the pink was already out from making yesterday's seahorse and was already being used on the second one below) so no excuse not to.  I made the dolphin to list in Etsy as a sort of 'would anybody really, really want one' but I must admit that I love it and will have to make another for myself!!!  I'll list it later (along with the seahorse) and then make another this evening!!
Reports are coming in from my 'snouts'  in Palmetto and apparently the roly poly bags were successful.  Whooooppeeeeeeeeeeee.

8 September 2008

Fiddling around and talking to myself!!!


First of all thanks to Tattycat and BJ who have awarded me the 'I love your blog' award.  I will add seven people later when I've done my 'duties' for the day (dad's housework etc)!!!!!
I finished a seahorse last evening and another is on the way too.  One of these is for my Etsy shop and the other is for a present.  I'm going to make another dolphin for the shop too and then a pair of earrings that I 'have in mnd'.  
The 3D dangly flower is sitting looking at me waiting to be finished too but I'm not inspired in that direction at the moment.  
Yesterday I finished off two roly poly bags and matching pouches but again am waiting to find the 'inspiration' to put them in the shop.  It takes quite a time to do the listings - it's the 'tag' part that really annoys me!!!  The rest I can copy and paste from something that's in the shop already but the tags - grrrrrrrrrrrrrrrrrrrrrrrrr.

6 September 2008

Not a lot to say!!!

This is silly.  I've not got a lot to tell today!!!  I've done a lot but nothing new or earth shattering to show.  
Yesterday I made some more roly poly bags and pouches.  Not the ones below but others which need finishing and photographing.  What else does an old git do when it rains constantly?
In the tatting part of my life I finished the basic 3D flower but it needs 'mounting/hanging' and  there lies a problem.  I've tried a couple of ideas but I'm not happy yet.  It also needs more beads.  I'm also still working on a birthday card.  No, tat's a lie.  I did nothing towards it yesterday cause I forgot!  I did some more to the baby booties in the evening and that's all!!!!

These are the bags I finished the week before my grandkids arrived.  They're not on Etsy yet and I'll probably not list them for a while until I've built up stocks.  Unless, of course, somebody wants them before then!!!!!

5 September 2008

New bags!!!

Here are some previews of the new bags!!! I'm not 100% sure of these yet but one thing I can say is that they're easy to use.  I've  made the top wider than the bottom so you don't need a telescope to see to the base and what is in there!!!  The one on the left and ini the middle is the larger one and the other on the right is a smaller version.  I've lined them so they could be reversible!!!


4 September 2008

New book on the shelf

Yesterday I got a new book.  This is so new that the ink's still wet!!!  Well, not really but you get the gist!!!  It's about tatting with the double bobbin shuttle and is by Sheron Goldin.  It's a really comprehensive technique book with a few patterns in to show how these shuttles can be used on loads more patterns.

I know it's going to be available at the Palmetto tat days this weekend and then afterwards from Sheron herself.  I can give you contact details if you write to me.


3 September 2008

More roly poly bags and ........

Yesterday I made two more roly poly bags and also tried out another idea for bags.  I made these other bags (1 large and 1 small) out of some fabric that I don't like!!!  When I'd finished them I couldn't make up my mind whether I liked the idea or not!!!  Now, is it the colour of the fabric or the actual design?  I used a regular design but have modified it slightly to give a wider top when opened out.  This should (well, it does, actually) give easier access to the contents.  I'll try and take a photo today and show them tomorrow.  

Tatting.  Well I'm back working on the 3D flower again.  I've repeated the one I did in that grotty green colour with the yellow beads.  This time I've played with bead numbers, added more to joining picots and actually used WHITE thread!!!!  I went to the cupboard to get the stuff to tat late yesterday afternoon and couldn't decide what coloured thread to use and as I think this design will be more about the beads I picked out white.  Anyway I also played with the next round but there are SO many options for this I think I'll do another trial before the 'real thing'.


2 September 2008

Spanish dancers

The working of the drawings and text are going well.  The text is finished.  I now have several 'heads and torsos' hanging around in tat corner but managed to finish both dancers yesterday evening to my satisfaction!!!  Next I have to check the drawings and finish off the web page.  This is where I lose interest again and am raring to go on the next idea!!!

In the afternoon I managed to finish off two more sets of roly poly bags.  I have another two sets to finish today and have thought out (and made in newspaper) the beginnings of an idea for another useful little bag.  This just needs me to work out a few more glitches before I make a 'proper' one.  I think I'll make this design in two sizes.  

Ah, here are the 'happy couple'!!!!

Creative Commons Licence

Happy Beaks

Happy Beaks
I beg your pardon? I didn't quite catch what you said.