16 April 2008

Christmas is coming!

OK, I know it's not coming just yet but it is on it's way and it does happen every year so I thought you'd like to see what a friend of mine has been up to. She's Jennifer Williams and is secretary of the Ring of Tatters.
Last Christmas her tree was featured on the cover of the 'new look' (and fabulous it is too) copy of the Ring of Tatter's newsletter.
She has since then spent a lot of time writing down her instructions and has now got it saved in the form of a pdf file which she's very happy to share - for FREE. If you live abroad (i.e. not in the UK) Jennifer will print out copies and mail them at cost. You'll have to ask her how much that will be when you let her know which country you're in!!
Another idea that she has been working on for her tatting group is diagrams on how to sew in ends. I've added that to my web page for her and you'll find it under the 'tips and techniques' section.
Just in case people miss her comment I'm adding Michelle's to the page below!!
"I've seen Jennifer's tree "in person" at one of the craft fairs, and it looks amazing. Espcially with the addition of a string of teeny, battery-powered lights.
And just a note that Jennifer's tree instructions include not only the tree branches, but the candles, baubles & decoration patterns as well." Michelle
Thanks, Michelle and I so agree with you. It's a stunning tree - it's been to visit me at home here too!!!

Patchwork

I've gone as far as I want to on this project although I might, just might add an edging to it eventually. It's not as good as I thought it was going to be. Sometimes finished work just doesn't turn out as you'd expect. I'd love to see this done in other colours but that will have to wait until I have more time. The mat measures about 9 1/2" across which is why I couldn't quite get it into the scanner!!!
Next on the list? I'll probably go back to another idea which will be a TIAS so this blog may be quiet for a while. Well, one can hope I can be quiet although it's not in the nature of the beast!!!

15 April 2008

New book

Yesterday, after a world tour, my book from Martha Ess finally arrived!! She mailed it to me almost a month ago but it must've been round the world before arriving here in the UK.
It's a great book from the 'queen of block tatting' and has all these patterns which you can see on the front and back covers - plus more! The variations on the little heart are SO cute.
Thanks, Martha. It was an honour and a pleasure to be asked to test tat a few of these patterns for your book. I will be available for the next one - hint, hint!!

11 April 2008

How to put a bead ...........

This has probably been done before but it's something I thought might be worth 'blogging'. Hopefully I'll also get round to putting it on a web page too one day soon - along with the rest of the patchwork instructions!!!
I was making some more of these earrings yesterday and realised that if anybody was to look carefully at them they might wonder how I got the large bead between the very long picot and the inner chain. This is how I did it!!!
When I make a very long picot I put the beads onto the thread at the back of my hand and hold them in place with a safety pin - like this. I find this method gives me a long picot which is easier to make and fits the required amount of beads each time.
Anyway, with this earwig I decided I'd like a larger bead in between the part I was working on (chain) and this long picot. When I got to the middle part of the chain under the vlp I put a large bead onto the chain thread.
Figure 1 shows where I'm going to place the bead.
In figure 2 I've added a large bead to the thread again and this time I post the very long picot through the loop above that bead. See fig. 3.
Just get the thread lying between the centre beads of the vlp (see the arrow in fig. 4) and tighten and continue.


I've gone off the rails!!

I've had some earrings admired several times lately by friends and have promised to make some for them. I've made these two pairs. One for a friend and t'other - well, either for me or to sell and because the first pair turned out so well!!
The thread I've used is Oren Bayan metallic which I bought from Lyn Morton at Tatting and Design.
The pattern is adapted from the
snowflake on my site - I have the notes on this if you want them. Please just drop me a line and I'll send you the file. I'm going to make another two pairs with other sparkly threads and then I promise I'll get back to the new idea and the patchwork!!
The new idea is smouldering in the brain as I walk in the afternoons. I usually find that walking gives me the time to plan and plot things!!!

10 April 2008

More squares!!

I didn't do a lot on this yesterday as 'another idea' hit me with a vengeance. Actually it started off reasonably well and then finished up like a damp squid after five 'starts'!!! I will get back to it later today, I hope!!!
As relaxation I went back to the patchwork and this is the progress I made!!

9 April 2008

Triangles over and done with!!

Well that's the triangles done with!!!
I could've gone further yesterday but I went to blood donor (number 69) in the afternoon and just before going out I grabbed a hanky edging which I normally take with me (at the moment it's my 'on the go' project!).
I didn't have time to do very much as they now run an appointment system which means that you don't sit around and wait for hours. Great! Anyway, when I got home I realised that I was coming up to a corner and would soon need new thread added. As I have to be waiting around a hospital waiting room next week I decided to get 'round the bend' (no comments about me already being there, please!) and add new thread. So, by the time I got back to the patchwork it was well into the evening!!!

Here are the triangles done.

8 April 2008

The triangle

I spent nearly the whole afternoon on the wretched triangle design and finally finished up with the attached yellow triangle. I wasn't particularly happy with it but it does lie well and that's all one can ask!!! I thought it wasn't going to but - finally when I showed it the iron it settled in well without any 'stretching' or 'bulging'!!!! Good job done!!!! (Family joke!).
I was going to do the triangles in blue as you can see by the other 'trials' on this round (there are another six aborted triangles lying around tat corner!) but in the end settled for a yellow triangle and a blue square. I'm also showing the final layout here (not with the same colours, obviously and it's a bit of a hurried drawing too). I hope to do this while I'm not playing with other stuff!!!!
I've had an idea for another design but we'll see!!!

6 April 2008

Designing the triangle

Yesterday saw progress on the triangle. Well, as much as could be expected after finishing the last round in the early evening when the brain was already tired!!! This is the latest round finished.

Now the triangle!!!
This element is proving to be a tad harder! It sounds simple enough - after all an equilateral triangle is half a square, isn't it? So, all I had to do was 'cut it in half'. A square, I mean.
Ah, no, not that easy! As you can see I assumed I was being very 'clever' and thought I could keep half the square but work from a different start point - finishing the third side with
SR's. I just couldn't get this to work - however hard I tried. Here are three of the attempts that didn't get thrown away.

Finally I decided to go with the
original 'format' of rings, chains and SCMR's (see the first one in the above group). The final attempt of the evening was to make one in the chosen next colour and add it to the piece I'm working on. I've left it for now but I'm not happy with it. I need to sort out the SCMR and play with the stitch count. It actually fits well with the previous round and I've 'tested' it with a 'reject' square and diamond and it fits well.
OK, another close look and I HATE it!!!! I've got to re-design from scratch.
I suppose I really ought to do an 'un-equilateral' triangle too!!!! Yes, I now know it's called an isosceles triangle!!! Just being silly now!!!

Further progress!

A few more 'patches' done and it's going to get exciting now as I'm forced by myself to do the triangle!!!!
I should get to it today. I shall add the triangle to the top of the square and then, I think, I can add more diamonds. Any other suggestions or layouts would be gratefully received if people want to send them to love to tat @ gmail.com.
You know me - always open to offers of help and advice!!!

5 April 2008

Sewn patchwork finished

I finished this the other day. I sew during the day if I've the time and inclination and tat during the evenings - always!! I have to tat in the evenings or I'd fall asleep in front of the tremendously boring telly!!
I'm 'brewing up' more sewing projects along these lines in the aged brain but they haven't quite formulated yet!!! Lack of time seems to be the biggest problem. Why that should be I don't know. Anyway, yet again, I digress. Here's the finished table covering.

4 April 2008

Progress on the patchwork

I made a few very silly mistakes on this last night!! You know the sort. The ones you make when you start to 'relax' into a pattern!!
I was determined to see if the diamond and square worked together.
THEY DO! I have pressed this (yes, I found the iron!) but that was just so it looked better when scanned. It sits beautifully without any 'teasing' into shape. I don't 'rate' a design until it sits properly on it's own without 'human' intervention at the end.
So, once I've finished this round I'll have to do the triangle. Unless I feel like working out another row!!! The triangle will go on top of the square if I've got it right!

3 April 2008

I've given up!!!

Well I've given up trying to work this out the 'proper' way and am just going back to 'Jane's' way of hit and miss!!!! This is where I've got to so far - see below!!!
I am now pretty sure that the square is fine so have started a 'church window' type of patchwork. I'm calling it that as the black outline resembles the lead around the windows in churches. This was one evening's work. Obviously I haven't pressed it yet.
The next thing I'll work is another diamond between the two squares - just to check that it really will lie well. As soon as this is done I will add the amended diamond pattern to my web pages and add the square.
I've amended the diamond with red italics to show front/back sided tatting for those who want to work this way. The more I use this notation and work like this the more I love it. Thank you Gary Houtz for pointing this out to me a few years ago at Rosemarie Peel's house.
Oh, by the way, the orange and pink are MUCH brighter than the scan shows!!!

2 April 2008

A dilemma

I have a dilemma. I cannot work out what sort of triangle I need or want to go with the diamond and squares I already have! This might sound very silly but it's important to me at the moment!!

I think I need two - an equilateral and an isoceles one. The isoceles will work on other layouts but the equilateral will work on the one below!!!

Can anybody in tatland, or anywhere else for that matter, please advise?

30 March 2008

Next step

I thought the square was fine but now I have tested it one more time I realise there's still more tweaking to do. It's below after the drawings. Probably just a matter of the stitch count on the SCMR's.
I started on the triangle too yesterday as a little 'light relief'!!!!! This is a lot more difficult but would probably be easier if I'd tried to work it out mathematically first.
Heck, why make life more difficult for myself by doing it that way? My mind just doesn't 'do' numbers!!!


Here are the first two (yikes, they're bad!) attempts at the triangle. The drawing above did help a lot, though.
I think today I will have to work out a possible combination of all three in a drawing to see how the triangle actually works with the other two. DO wish I could do this mathematically!!!!

29 March 2008

Progress and lack of!!!

This is the progress on the square to fit with the diamond.
First of all there these two false starts. Where was the brain when I tried these?
Next I drew two rough ideas on the computer. BOY, were they rough too!!!! I actually used the diamond drawing and 'played' with that.

Next I tried the following but it obviously wasn't going to work but showed me a good path towards the end result. See the ghastly joins in the centre? That's cause I changed my mind!!! I then cut this piece at those joins. Can't remember why but it gave me a very good idea that if I carried on it might work out!!!

The final picture shows from left to right the progress made later in the evening. This is all to do with stitch count really. They all three look the same BUT they're not. I'm having to make the rings smaller to get the shape 'squarer' but without losing the placement of the outer picots as (at the moment) they APPEAR to fit in with the diamond. This really, really has to be tested in a largish piece to see if it will work. Do I continue with the square or start in on the triangle. All answers on a postcard, please!!!!! Or not, if you can't be bovvered!!!!

27 March 2008

Tatting Patchwork shapes

Well I had a quiet start back into 'tat mode'!! I've decided to leave aside a design I'd started on before my break (sorry, Georgia!) for a few days until I've got this patchwork phase out of my brain.
I want to do a square and triangle to go with the diamond. I looked at the diamond pattern on my site and realised that the first thing I had to do was to alter it so that it shows right side wrong side tatting. Yesterday evening I re-tatted it and altered the notation in a word document.
I then started on the square. Well, I tried!! The two pathetic attempts are not even worth putting on the scanner!!! I think the best way to tackle this is to use my drawing program and 'play' with it to make a square using the same elements. The problem I can see is making the two new patterns in the same 'format' as the diamond.
Still, knowing me it'll eventually get done I expect!!!
PS to this post. Riet's just told me about this book on tatted patchwork. I shall buy this once I've finished my square and triangle. Don't want to be influenced by anything in
Adelheid Dangela's book.

I'm BACK!

Well the patchwork is now well under control and growing daily. I'm fed up with it at the moment so in order to finish it I'm putting it down for a while! Only for a few hours, though.
While I've been working on it it's given me time to think about tatting. I NEED to tat a patchwork. OK I know I've done a diamond in the past which is here but now I NEED to make up a matching square and triangle. I think that will be the next project - starting this evening!!!!! I'm going to make tatting my evening hobby and any time I've got spare in the day will be devoted (for now) to patchwork and catching up on sewing projects (alterations etc) that are piling up.
The weather may turn a bit warmer so I can get the sewing machine out in the conservatory (with Tilly the cat's permission!) and work on HER table!!!

24 March 2008

Patchwork - 3

Another day and another 'round' if that's right!!! I can only get part of it on the scanner now. Next time I'll have to take a photo. That's if the sun ever appears again to allow a decent shot of it!!!
My finger's getting sore now so I'll have to find a thimble or return to do some tatting. While I'm sewing the tatting ideas are stacking up in the old brain!!!

23 March 2008

Patchwork - 2

Ooooh, this is fun. I do wish I could plan ahead though. There again, if I did that it wouldn't be a surprise each day, would it?
This is how far I've got now.

22 March 2008

Patchwork - 1

After well over twenty years of not doing any patchwork I found that the skill is still there!! The fat quarters that SueH sent me are absolutely ideal. Those and an 'out of date' Woolworths catalogue make ideal companions. I've no idea where this is leading - I've just started and am going to use my usual methods of 'hit and miss'.

21 March 2008

Diane's TIAS and further ramblings!

Well I've finished the TIAS along with lots of othern people too!!! I enjoyed doing this a lot.
Now I have an announcement to make. I have decided to give up tatting for a while.
I collected lots of books while I was working so that I'd have 'something to do' when I retired. Books on all sorts of crafts and now that I've been 'retired' for quite a few years I'm going to start looking at them and doing something else for a change. Not sure quite what just yet but a return to hand sewn patchwork is probably the first stop.

SueH sent me some lovely 'fat quarters' a few weeks ago and my fingers have been itching since to do some sewing since they arrived. Problem is that the templates that I really want to use have 'gone missing'. Either that or I've been robbed again!!
Since starting this post yesterday I found a new packet of unopened templates that I bought when a local shop was closing down about thirty to forty years ago. There is a diamond, a square and a triangle in the packet so that's what I'm going to use. The hexagon template (which is missing) is probably too small for me until my new specs are ready. It's only 3/4" in diameter.

I know what I'm like - as soon as I get started on this new project I'll think of some tatting that 'needs doing'!!! I'll post as I go along on this so the blog won't be quiet!! I wonder whether this will come under the 'nothing much else' remit as in the title of the blog???!!!!

19 March 2008

Not a TIAS but a 'Share a Tat'

Nowadays it's becoming more and more difficult to come up with original ideas and sometimes it's nice just to do something simple.
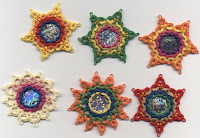
So the sequins I've been re-visiting after several years are really simple. I think this may be a good time to introduce a 'Share a Tat' game!!!!
What I intend to do is to post the way I've found of enclosing the sequin and perhaps one or two of the patterns I've done - just to give some idea of stitch count etc.
I'm NOT going to add any copyright notice to these as I don't feel that they're 'important' enough and it will allow everybody to play the game.
I will then invite all and sundry (especially new tatters) to join me to discover as many ways as possible of making this into a motif, mobile, etc. Note, I haven't added any beads or used techniques other than rings, chains and split rings so there's room for plenty more ideas!!
I am more than happy to 'host' any patterns derived from this on a new 'guest' section of my pattern pages, or add links to other pages on other sites. I would only ask that if you write your patterns a different way to the way I do that you alter the original accordingly and add any new abbreviations. This will make it clearer for those wanting to tat them. My way of writing patterns is not necessarily everybody's 'cup of tea'!! I will not be adding any copyright notice to my patterns but you are welcome to add it to yours.
It would be very interesting to see how many different ideas can stem from one sequin. Not as many as there were hippos!!!!
I hope to get the pattern up on my site tomorrow and will let everybody know when it's there. You will need sequins measuring 7/8" in diameter.
Here is another idea but no pattern to go with it!!!


18 March 2008

Back to the sequins

I need to work one or two more of these before I start on another crazy idea!!! Yes, it will involve all who want to 'have a go'!!! No, it's not a TIAS as it will be 'sequin related'!!! For those who may want to take part or those who want to have a go at the ones I've already done then you'll need sequins, thread, beads etc. The sequins should be 7/8" in diameter.
All will be revealed once I've sorted the only two brain cells out which I've got left!!!

16 March 2008

Sunday!

Well I didn't pick up a shuttle at all on Saturday. Too much going on here. BUT yesterday was quite the opposite. I was chosen to be one of the demonstrators for the Ring of Tatters at the NEC. For those who don't know - this is the National Exhibition Centre here in the UK. It's a huge site with about eight very large halls where exhibitions are held.
From Thursday to Sunday of last week the
Sewing for Pleasure and Hobbycraft exhibitions were held in adjacent halls. The site is about 25 miles from where I live. The Ring of Tatters are given a stand at this exhibition purely to demonstrate and teach people who want to learn or who want to know more about our addiction! This is always a very busy and happy day - meeting up with friends on the stand and often friends passing by. We take some of our tatting with us to decorate the stand and then assist as and when needed.
This year
Rosemarie Peel was there and I asked her how her new book was coming along! Life seems to be delaying the much awaited next book from Rosemarie.
Michelle Roebuck - the editor of the Ring's 'new look' newsletter was there too. We had a good natter about Diane's TIAS and both of us admitted we were flumoxed about what it was going to be!!!
I was very good and didn't come home with any beads OR threads. I'd told myself that I didn't need any more threads or beads and for once I actually listened and took note!! BUT I did come home with a new gismo for loading beads onto threads. It's a bit like this but the one I bought is is a small plastic one. What I did buy to go with it is a 'bent' long (very long) needle to go with it. I'll show you when I get a chance to take a photo of it.
I got home at just gone six o'clock. Totally tired, with a sore throat (too much talking!) and a thirst which needed quenching with a large glass of red wine!!!

14 March 2008

Playing with sequins!

A few days ago I posted some pictures of sequins that I'd played with some years ago. I showed the backs too where I'd tried another way for 'one sided' viewing. The originals that I made had two separate rows of split rings (one at the front and the other at the back) which were then joined with the outer row. This obviously took a bit of time to do as there were two 'cuts and ties' etc.
Yesterday I finally sat down to write this pattern. I may have it somewhere on my main computer but by the time I settled into 'tat corner' in my comfy chair I was on my laptop.
Then a thought occurred to me. I wonder if both 'sides' of the enclosing rows could be worked in one 'hit'. Surely it could.
Well, ta de dah. Here's the second attempt which will form the basis for the next round or rounds.
I'm not sure quite how the rest will work out but the 'creative juices' are not as dozy as they were!!!
Below I have shown the original with the back which makes the use of the sequin 'decoration' one sided. Next is the one side of the new version and finally the other side of the new version. Originally (and I can't find any samples) both sides looked like the new version but were made separately.
I now intend to play with this as I can feel a wealth of ideas creeping up on me!!!

12 March 2008

A new thread

On Monday a small unexpected package arrived for me. I LOVE surprises and what was even better it was a ball of thread. Jenny Griffin sent it as a 'thank you' for doing the TIAS.
I'd never seen or heard of this thread - it's brand new from Coats in Germany. It's called Anchor Artiste and this particular ball is a number 20 and holds 20 grammes.
The colour is a very yummy variagated lilac. I worked up a bookmark using it alongside a Manuela thread. I would say that it is exactly the same as Flora and not as 'harsh' as Floretta. The only snag I can find is the price which I found it listed on one site.
I'm not giving the link to that site as I'm hoping that others will sell it a bit cheaper. Hint, hint to any thread suppliers that are reading this!!!
Here is the bookmark I made!!!

11 March 2008

Bracelets

I love bracelets. I don't often wear them in the winter but in the summer I love bracelets (oh, never forget the earrings!!!). I looked again at the bracelet I made the other day and thought that I'd make one more to get this 'phase' out of my system. I used black, white and cream with a very pretty and shiny black button in the centre. I do hope I can now kick this one out of the window for a while and start on something new. Maybe think about another TIAS. So enjoying doing Diane's, though.

10 March 2008

Easter!

This is just a small chick in a basket I did yesterday. I remembered to write it down (well, roughly!) as I went along!!! Perhaps, if I did it again, I'd put the eye in on a drop picot but as I did it last thing in the evening it was whatever came into the tired old brain at the time!!

9 March 2008

I've not been robbed!

I found the catches. Finally after yet another search they were exactly where I'd put them!! I just didn't think I'd have put them with the magnetic beads!!! I can't think why I didn't remember but as I have a poor memory (and always have had!) I'll put it down to that!!!
This is what I made once they'd been found!!! I used the pattern for the letter beads and added 'ordinary' beads instead!!! The worst part of working this pattern for me is doing the maths on it!! I've never been comfortable with numbers!!! Also it would help if I could read a pattern. My own, believe it or not!!! I just tend to assume I know what I'm doing and forget to stop and read the instructions!!! I'm going to do another today - just to be sure that I know what I'm doing!!!!

8 March 2008

I've been robbed!

I know some of you will sympathise and some of you will giggle but I'm sure I've had burglars in the house. Either that or this house just deliberately hides things!!! I've spent two hours in my stash cupboard looking for some magnetic catches which I KNOW I've got in there somewhere. I'm beginning to think that there's been somebody in the house (probably during the night) who has stolen them. Nick wouldn't dare and Tilly the cat wouldn't be interested but ...... I can't find them. Anyway, I did unearth some sequins!!! I am hoping to get back to playing with sequins again. I spotted my tatted bag during my search too and also remembered the sequin mobile and tatted box that I did in the past too. So, after making another bracelet this evening (as if I NEED more bracelets!!) I shall go back to playing with sequins!!! The first picture shows the 'right side' in this experiment and the second shows how I covered the sequins when the back wasn't going to show (as on the bag). With the tatting bag I think I used a different outer round.
I do wish I'd written it all down!!!

Creative Commons Licence

Happy Beaks

Happy Beaks
I beg your pardon? I didn't quite catch what you said.